Introduction Link to heading
So far, all our work is on our docassemble install, which has been quite a breeze. Now we come to the most critical part of this tutorial: working with an external service, Google Text to Speech. Different considerations come into play when working with others.
In this part, we will install a client library from Google. We will then configure the setup to interact with Google’s servers and write this code in a separate module, google_tts.py. At the end of this tutorial, your background action will be able to call the function get_text_to_speech and get the audio file from Google.
1. A quick word about APIs Link to heading
The term “API” can be used loosely nowadays. Some people use it to describe how you can use a program or a software library. In this tutorial, an API refers to a connection between computer programs. Instead of a website or a desktop program, we’re using Python and docassemble to interact with Google Text to Speech. In some cases, like Google Text to Speech, an API is the only way to work with the program.
The two most common ways to work with an API over the internet are (1) using a client library or (2) RESTful APIs. There are pros and cons to working with any one of these options. In this tutorial we are going to go with a client library that Google provided. This allows us to work with the API in a programming language we are familiar with, Python. RESTful APIs can have more support and features than a client language (especially if the programming language is not popular). Still, you’d need to know your way around the requests and similar packages if you want to use them in Python.
2. Install the Client Library in your docassemble Link to heading
Before we can start using the client library, we need to ensure that it’s there in our docassemble install. Programming in Python can be very challenging because of issues like this:
 source: https://imgs.xkcd.com/comics/python_environment.png
Luckily, you will not face this problem if you’re using docker for your docassemble install (which most people do). Do this instead:
- Leave the Playground and go to another page called “Package Management”. (If you don’t see this page, you need to be either an admin or a developer)
- Under Install or update a package, specify
google-cloud-texttospeechas the package to find on PyPI - Click Update, and wait for the screen to show that the install is OK. (This takes time as there are quite a few dependencies to install)
- Verify that the
google-cloud-texttospeechpackage has been installed by checking out the list of packages installed.
3. Set up a Text To Speech service account in docassemble Link to heading
At this point, you should have obtained your Google Cloud Platform service account so that you can access the Text to Speech API. If you haven’t done so, please follow the instructions here. Take note that we will need your key information in JSON format. You don’t need to “Set your authentication environment variable” for this tutorial.
If you have not realised it yet, the key information in JSON format is a secret. While Google’s Text to Speech platform has a generous free tier, the service is not free. So, expect to pay Google if somebody with access to your account tries to read The Lord of the Rings trilogy. In line with best practices, secrets should be kept in a private and secure place, which is not your code repository. Please don’t include your service account details in your playground files!
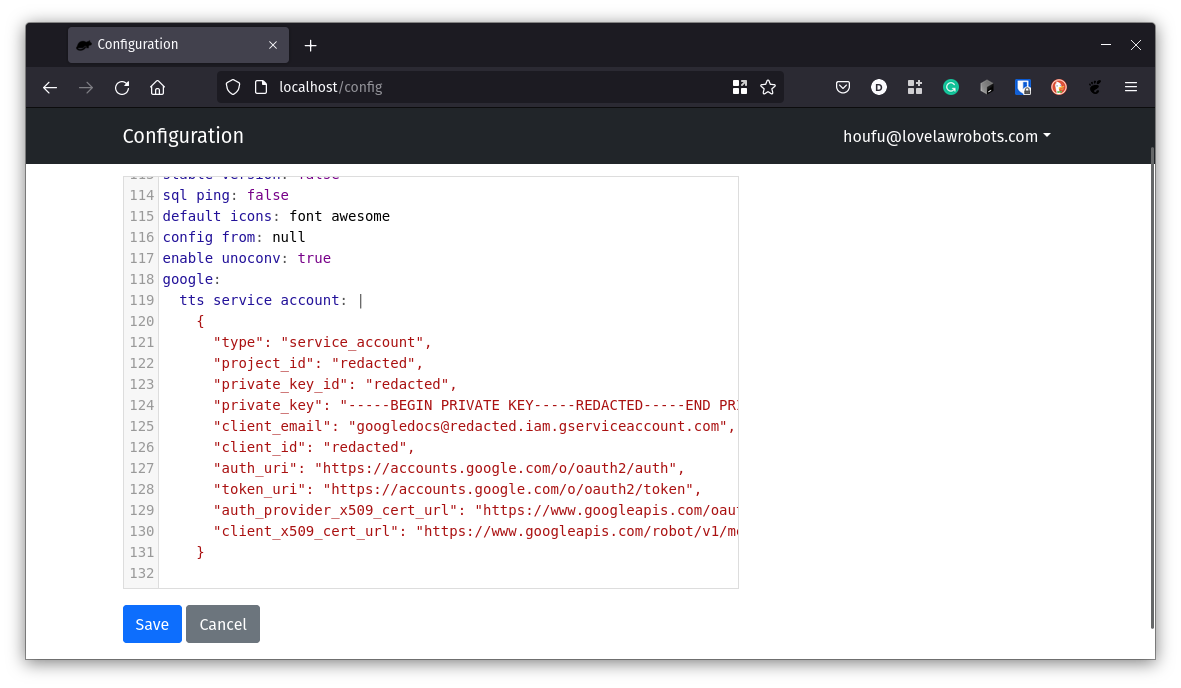
Luckily, you can store this information in docassemble’s Configuration, which someone can’t access without an admin role and is not generally publicly available. Let’s do that by creating a directive google with a sub-directive of tts service account. Go to your configuration page and add these directives. Then fill out the information in JSON format you received from Google when you set up the service account.
 In this example, the lines you will add to the Configuration should look like lines 118 to 131.
4. Putting it all together in the google_tts.py module
Link to heading
Now that our environment is set up, it’s time to create our get_speech_from_text function.
Head back to the Playground, Look for the dropdown titled “Folders”, click it, then select “Modules”.
Look for the editor and rename the file as google_tts.py. This is where you will enter the code to interact with Google Text to Speech. If you recall in part 3, we had left out a function named get_text_to_speech. We were also supposed to feed it with the answers we collected from the interviews we wrote in part 2. Let’s enter the signature of the function now.
    def get_text_to_speech(text_to_synthesize, voice, speaking_rate, pitch):
      //Enter more code here
      return
Since our task is to convert text to speech, we can follow the code in the example provided by Google.
A. Create the Google Text-to-Speech client Link to heading
Using the Python client library, we can create a client to interact with Google’s service.
We need credentials to use the client to access the service. This is the secret you set up in step 3 above. It’s in docassemble’s configuration, under the directive google with a sub-directive of tts service account. Use docassemble’s get_config to look into your configuration and get the secret tts service account as a JSON.
With the secret to the service account, you can pass it to the class factory function and let it do the work.
    def get_text_to_speech(text_to_synthesize, voice, speaking_rate, pitch):
        from google.cloud import texttospeech
        import json
        from docassemble.base.util import get_config

        credential_info = json.loads(get_config('google').get('tts service account'), strict=False)

        client = texttospeech.TextToSpeechClient.from_service_account_info(credential_info)
Now that the client is ready with your service account details, let’s get some audio.
B. Specify some options and submit the request Link to heading
The primary function to request Google to turn text into speech is synthesize_speech. The function needs a bunch of stuff — the text to convert, a set of voice options, and options for your audio file. Let’s create some with the answers to the questions in part 2. Add these lines of code to your function.
The text to synthesise:
input_text = texttospeech.SynthesisInput(text=text_to_synthesize)
The voice options:
    voice = texttospeech.VoiceSelectionParams(
            language_code="en-US",
            name=voice,
        )
The audio options:
    audio_config = texttospeech.AudioConfig(
            audio_encoding=texttospeech.AudioEncoding.MP3,
            speaking_rate=speaking_rate,
            pitch=pitch,
        )
Note that we did not allow all the options to be customised by the user. You can go through the documentation yourself to figure out what options you need or don’t need to worry the user. If you think the user should have more options, you’re free to write your questions and modify the code.
Finally, submit the request and return the audio.
    response = client.synthesize_speech(
            request={"input": input_text, "voice": voice, "audio_config": audio_config}
        )

    return response.audio_content
Voila! The client library could call Google using your credentials and get your personalised result.
5. Let’s go back to our interview Link to heading
Now that you have written your function, it’s time to let our interview know where to find it.
Go back to the playground, and add this new block in your main.yml file.
    ---
    modules:
      - .google_tts
    ---
This block tells the interview that some of our functions (specifically, the get_text_to_speech function) is found in the google_tts module.
Conclusion Link to heading
At the end of this part, you have written your google_tts.py module and included it in your main.yml. You should also know how to install your python package to docassemble and edit your configuration file.
Well, that leaves us with only one more thing to do. We’ve got our audio content; now we just need to get it to the user. How do we do that? What’s that? DAFile? Find out in the next part.